
Key Takeaway
- Registering for GST is mandatory for businesses exceeding the turnover threshold or engaging in inter-state supply and e-commerce.
- There are multiple types of GST registrations tailored to different business needs, such as Regular, Composition Scheme, and Non-Resident Taxable Person.
- Essential documents for GST registration include proof of identity, address, bank statements, and additional business details.
- The process of uploading a JSON file to the GST portal involves accessing the Returns Dashboard, selecting the return period, and ensuring successful file validation.
- Thoroughly reviewing uploaded data on the GST portal helps avoid discrepancies and ensures accurate GST return filing.
Who Needs to Register for GST?

The Goods and Services Tax (GST) has streamlined taxation in India by consolidating multiple indirect taxes under one umbrella. But who exactly needs to register for GST? Any business with an annual turnover exceeding the threshold limit set by the GST Council must register for GST. The current limit is ₹20 lakhs for most states, and ₹10 lakhs for special category states. However, businesses involved in inter-state supply of goods, e-commerce operators, and those who wish to avail of the Input Tax Credit (ITC) must also register, regardless of turnover.
💡If you want to pay your GST with Credit Card, then download Pice Business Payment App. Pice is the one stop app for all paying all your business expenses.
There are also mandatory registration criteria for specific businesses, including those dealing in taxable supply, the need for an authorized signatory, and businesses that have to comply with various state-specific regulations. Business types vary from sole proprietorships and partnerships to corporations and government agencies. Registration ensures that businesses can legally collect GST from customers and claim ITC on their purchases, contributing to their financial efficiency and compliance.
Moreover, businesses that anticipate their turnover to cross the threshold should proactively register to avoid penalties. The GST registration process involves submitting several documents, including proof of address, proof of identity, bank statements, and other additional documents. This helps in verifying the business details and establishing the legitimacy of the application.
Types of GST Registration
GST registration can be classified into several types, depending on the nature and turnover of the business. The most common types are:
- Regular Registration: This is the standard registration for businesses exceeding the threshold turnover. It allows the business to collect tax, claim ITC, and comply with the GST laws.
- Composition Scheme: This is for small businesses with turnover up to ₹1.5 crore. It allows them to pay tax at a fixed rate on turnover and file quarterly returns. However, they cannot claim ITC.
- Casual Taxable Person: This is for businesses that operate occasionally, like a stall at a trade fair. They need to deposit an advance tax based on estimated turnover.
- Non-Resident Taxable Person: This is for non-residents who occasionally supply goods or services in India. They must also deposit advance tax.
- Input Service Distributor (ISD): This is for businesses that distribute ITC to their branches having the same PAN.
- E-commerce Operators: Entities facilitating online sales must register irrespective of turnover, ensuring they can handle the compliance for inter-state supply.
Each type of registration serves a different purpose and has distinct benefits and limitations. The choice of registration type affects how businesses manage their GST compliance, file returns, and claim ITC. Understanding the nuances of each type is crucial for businesses to optimize their tax strategy and avoid errors in their GST returns.
Essential Documents for GST Registration

Registering for GST requires several critical documents to validate the business identity, address, and banking details. The following are the essential documents needed for GST registration:
- Proof of Identity: This includes PAN card of the business or applicant, Aadhaar card, passport, voter ID, or driving license.
- Proof of Address: This can be a rent agreement, electricity bill, property tax receipt, or any other document proving the business address.
- Bank Statement: A recent bank statement or a canceled cheque to verify banking details.
- Business Details: Information such as the constitution of the business (partnership deed, incorporation certificate), business type, and business practices.
- Additional Documents: Depending on the business type, additional documents such as proof of appointment of an authorized signatory, registration certificate in case of other statutory registration, and any additional information fields or query response fields required during the application process.
- Original Application and Supporting Documents: The original registration application along with the required supporting documents in PDF format ensures the authenticity and completeness of the application.
Having these documents prepared and correctly uploaded can significantly smoothen the GST registration process, minimizing the chances of rejection due to errors or mismatches in the application.
Steps to Upload Documents on the Portal
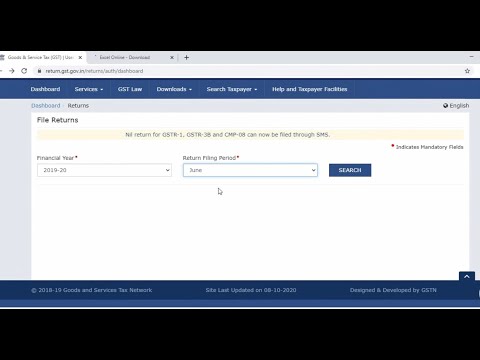
Step 1: Open Your GST Returns Dashboard
To begin filing your GST returns, you need to access your GST Returns Dashboard on the GST Portal. This dashboard serves as the central hub where you can view and manage all your GST return activities. After logging in with your credentials, navigate to the “Services” tab and select “Returns Dashboard” from the drop-down menu. This section will display all relevant fields for return filing and allow you to choose the appropriate return form.
Here, you can view past returns, download formats, and even access help sections for any queries raised. The dashboard is designed to streamline the return filing process, providing a comprehensive overview and easy access to all necessary functionalities.
Step 2: Choose the Month for GST Return Filing
After accessing the Returns Dashboard, the next step is to select the month for which you need to file the GST return. The calendar icon will help you navigate through the months and select the relevant time period for your filing. It’s essential to ensure you’re choosing the correct month to avoid any errors or mismatches in your return filing.
Choosing the right month will also help you keep track of your annual turnover and ensure all transactions are accounted for in the respective fields. This step is crucial for maintaining accurate and compliant records of your GST transactions.
Step 3: Upload the JSON File to GSTN
Once you have selected the month, the next step is to upload the JSON file to the GST Network (GSTN). This file contains all the data regarding your sales, purchases, and ITC claims. You can generate this file from your accounting software or use the offline tool provided on the GST Portal.
To upload, go to the relevant section on the portal and use the upload option to submit your JSON file. Ensure the file is in the correct format and contains all the necessary details. An error message may appear if there are any issues with the file, so it’s crucial to double-check everything before uploading.
Step 4: Confirm Successful Upload of the JSON File
After uploading the JSON file, you need to confirm that it has been uploaded successfully. The GST Portal will display a success message once the file is accepted without any errors. This confirmation is critical as it indicates that your data has been received and processed by the GSTN.
In case of any issues, you may receive a warning message or error message specifying the problem. You must resolve these issues promptly to ensure your return is filed correctly. Keep a record of this confirmation for your records and future reference.
Step 5: Review Data on the GST Portal
The final step involves reviewing the data on the GST Portal. This step ensures that all the details in your uploaded file are accurate and match your original application and supporting documents. Go through each entry carefully, including taxable supplies, business details, and ITC claims.
Make sure there are no mismatches or missing information. Reviewing your data thoroughly will help avoid any future discrepancies or queries from the tax authorities. Once you are satisfied with the accuracy, proceed to file the return.
Instructions for Downloading the JSON File for GST Return Filing
Downloading the JSON file for GST return filing is a straightforward process. First, log in to the GST Portal and navigate to the Returns Dashboard. Select the relevant month and click on the option to download the JSON file. This file contains pre-filled data based on your previous filings and transactions.
Ensure you save the file in an easily accessible location on your computer. You can then use this file to make any necessary updates or corrections before uploading it back to the GSTN. This process helps in maintaining consistency and accuracy in your return filings.
FAQs
How to upload a file in GST portal?
To upload a file on the GST portal, log in to your account, navigate to the Returns Dashboard, select the relevant return period, and choose the file upload option. Ensure your file is in the correct format (such as JSON or CSV) and click the ‘Upload’ button. The portal will validate and process the file, displaying a success message upon successful upload.
How do I upload invoices to the GST portal?
To upload invoices, first log in to the GST portal and go to the Returns section. Select the appropriate return form (e.g., GSTR-1), and click on the ‘Prepare Online’ or ‘Upload’ button. Use the provided options to upload your invoices in the required format, ensuring each invoice detail is correctly filled.
How to upload GSTR 2 in GST portal?
Currently, GSTR-2 is suspended; however, the process would typically involve logging in to the GST portal, navigating to the Returns Dashboard, selecting GSTR-2, and uploading the required details in the prescribed format. The data can be uploaded manually or via a JSON file prepared offline using the GST offline tool.
How to upload JSON file in new GST portal?
To upload a JSON file, log in to the new GST portal and go to the Returns Dashboard. Select the appropriate return period and form, then click on the ‘Upload’ button. Browse and select your JSON file, and upload it; the system will validate and confirm the upload with a success message.
Can we upload Excel file in GST portal?
The GST portal does not directly accept Excel files. Instead, you must convert your Excel data into a JSON file using the GST offline tool or another compatible software. Once converted, you can upload the JSON file to the GST portal.
How do I upload a CSV file to GST?
To upload a CSV file, first ensure it is correctly formatted as per GST requirements. Log in to the GST portal, navigate to the relevant section (e.g., Returns Dashboard), and select the upload option. While the portal does not accept CSV directly, you can use the offline tool to convert CSV data into a JSON file for uploading.


